
How to Size a Grid-tie Solar PV System
There are many articles currently available on the internet that claim to tell you how to size your home solar PV system, and while some of them give some good advice (and some terrible advice), they usually give a method of system sizing that is only appropriate for one specific type of system and only apply to one country or region.
This article will take you step by step through sizing your grid-tied residential solar PV system regardless of your goals for the system and regardless of which country or region you are from.
What are your options for feeding electricity back to the grid?
Depending on where you live, you will be faced with different rules around how you will be compensated for feeding electricity back to the grid. These rules are determined by your state, or by your utility and can have a large impact on the size of your PV system
The three most common scenarios are net metering, a feed-in tariff, or no compensation.
Net metering
Net metering is when any additional energy you don’t use is fed back into the grid and you are given credits for this energy, almost like winding your meter back. This allows you to use the grid like a giant battery, storing your solar energy for use after the sun goes down.
Feed-in tariff
A feed-in tariff is when you are paid a specific amount for the energy you don’t use and feed back to the grid. Originally feed-in tariffs were quite high, to encourage the growth of the solar industry. Now in some countries such as Australia, the tariff can be much lower than what you normally pay for your electricity.
No compensation for exporting
In some areas, you won’t be compensated at all for any electricity you feed back into the grid. It is still useful to be connected so you can use the grid at night without installing a battery, but any electricity that is generated by your solar system and not used by your household is essentially wasted.
Whichever of these applies to you, will completely change how you approach your system sizing. Generally with net metering you should aim to match your annual electricity usage, as you often don’t get paid for overproducing. With a very high feed-in tariff you will usually try to install the largest system you can afford. And with a very low, or no feed-in tariff, you need to size your system so you use as much of the electricity your system produces as you can, and try not to export too much to the grid.
To determine which system is applicable in your area searching online is a good start. If you can’t find the information you are looking for, you should contact your local utility directly.
A few useful websites to start:
- USA – https://www.dsireusa.org/
- Europe – http://www.res-legal.eu/search-by-country/
- Australia – There are both government-mandated feed-in tariffs, and those offered by utilities.
- https://www.energymadeeasy.gov.au – A website where you can find the official government rates. You need to fill in the fields, then select each offer individually to see the feed-in rate.
- https://www.canstarblue.com.au/solar-power/a-comparison-of-solar-feed-in-tariffs/ – Gives an overview of the tariffs offered by each utility.
Determining PV system size when net metering is available
If net metering is not available in your area, click here to skip to the next section.
If you are living in an area where net metering is offered, then sizing your system is relatively straight forward. You will generally want your system to produce the same amount of electricity as you consume in one year, as this will maximize your return on your investment.
If at the end of the year, you have produced more electricity than you have used, most net metering schemes will not allow these credits to roll into the next year. Therefore you are not getting paid for some of the electricity that you have produced, and you usually would have been better off saving money by installing a smaller solar PV system.
On the other hand, it may make sense to oversize your system if you are planning to increase the electricity usage in your home in the future. For example switching to an electric car, switching from gas to electric cooking and heating, or if a member of the household is likely to be spending more time at home, for example a stay-at-home mom or someone retiring. Depending on how far into the future you are planning to make these changes, it could also be worth considering building a smaller system now with the flexibility to increase the system size later.
Be careful when oversizing your system, as some utilities may deny your application to connect if your system appears to be larger than necessary given your past usage history. You always need to confirm that your utility will allow the system size you plan to install before purchasing components etc.
The following method will target reducing your average power bill to zero over the year. Keep in mind that this is based on averages, so individual years will vary. Also remember that solar PV systems degrade over time, so the system will produce a smaller percentage of your total power consumption in later years.
If you would rather use an online calculator to do this calculation for you, you can consider skipping to the online calculator’s section below. However, it is still useful to understand the following information and it may help you to properly use those calculators.
Steps to take
1. Determine your average electricity usage per day in kWh
The easiest way to do this is simply by checking your power bills for the past year. It is important to consider an entire year because your electricity usage can vary considerably from month to month, due to heating and air conditioning etc. Once you have added up how much electricity you used for the whole year, divide it by 365 to get your daily usage.
For example, let’s assume your yearly electricity usage is 10,000kWh. This is a little bit lower than the average for a household in the U.S. Dividing by 365 days, gives 27.4kWh per day. This is the amount that you would want your solar PV system to produce on average per day.
If your full year’s usage history is not available. It is also possible to calculate your estimated load using one of the many online calculators available. This will likely be less accurate, however, as you have to estimate how often you use each of your appliances.
2. Find out how much sunlight falls at your location on an average day.
Not every location is exposed to the same amount of energy from the sun, so you need to determine how much can be expected in your area.
First find the average yearly, or daily “Global Horizontal Irradiance” for your location. This is the amount of solar radiation that hits a horizontal surface at a specific location.
If you are in the U.S. You can use this resource map from the National Renewable Energy Laboratory (NREL) to find the average daily irradiance.
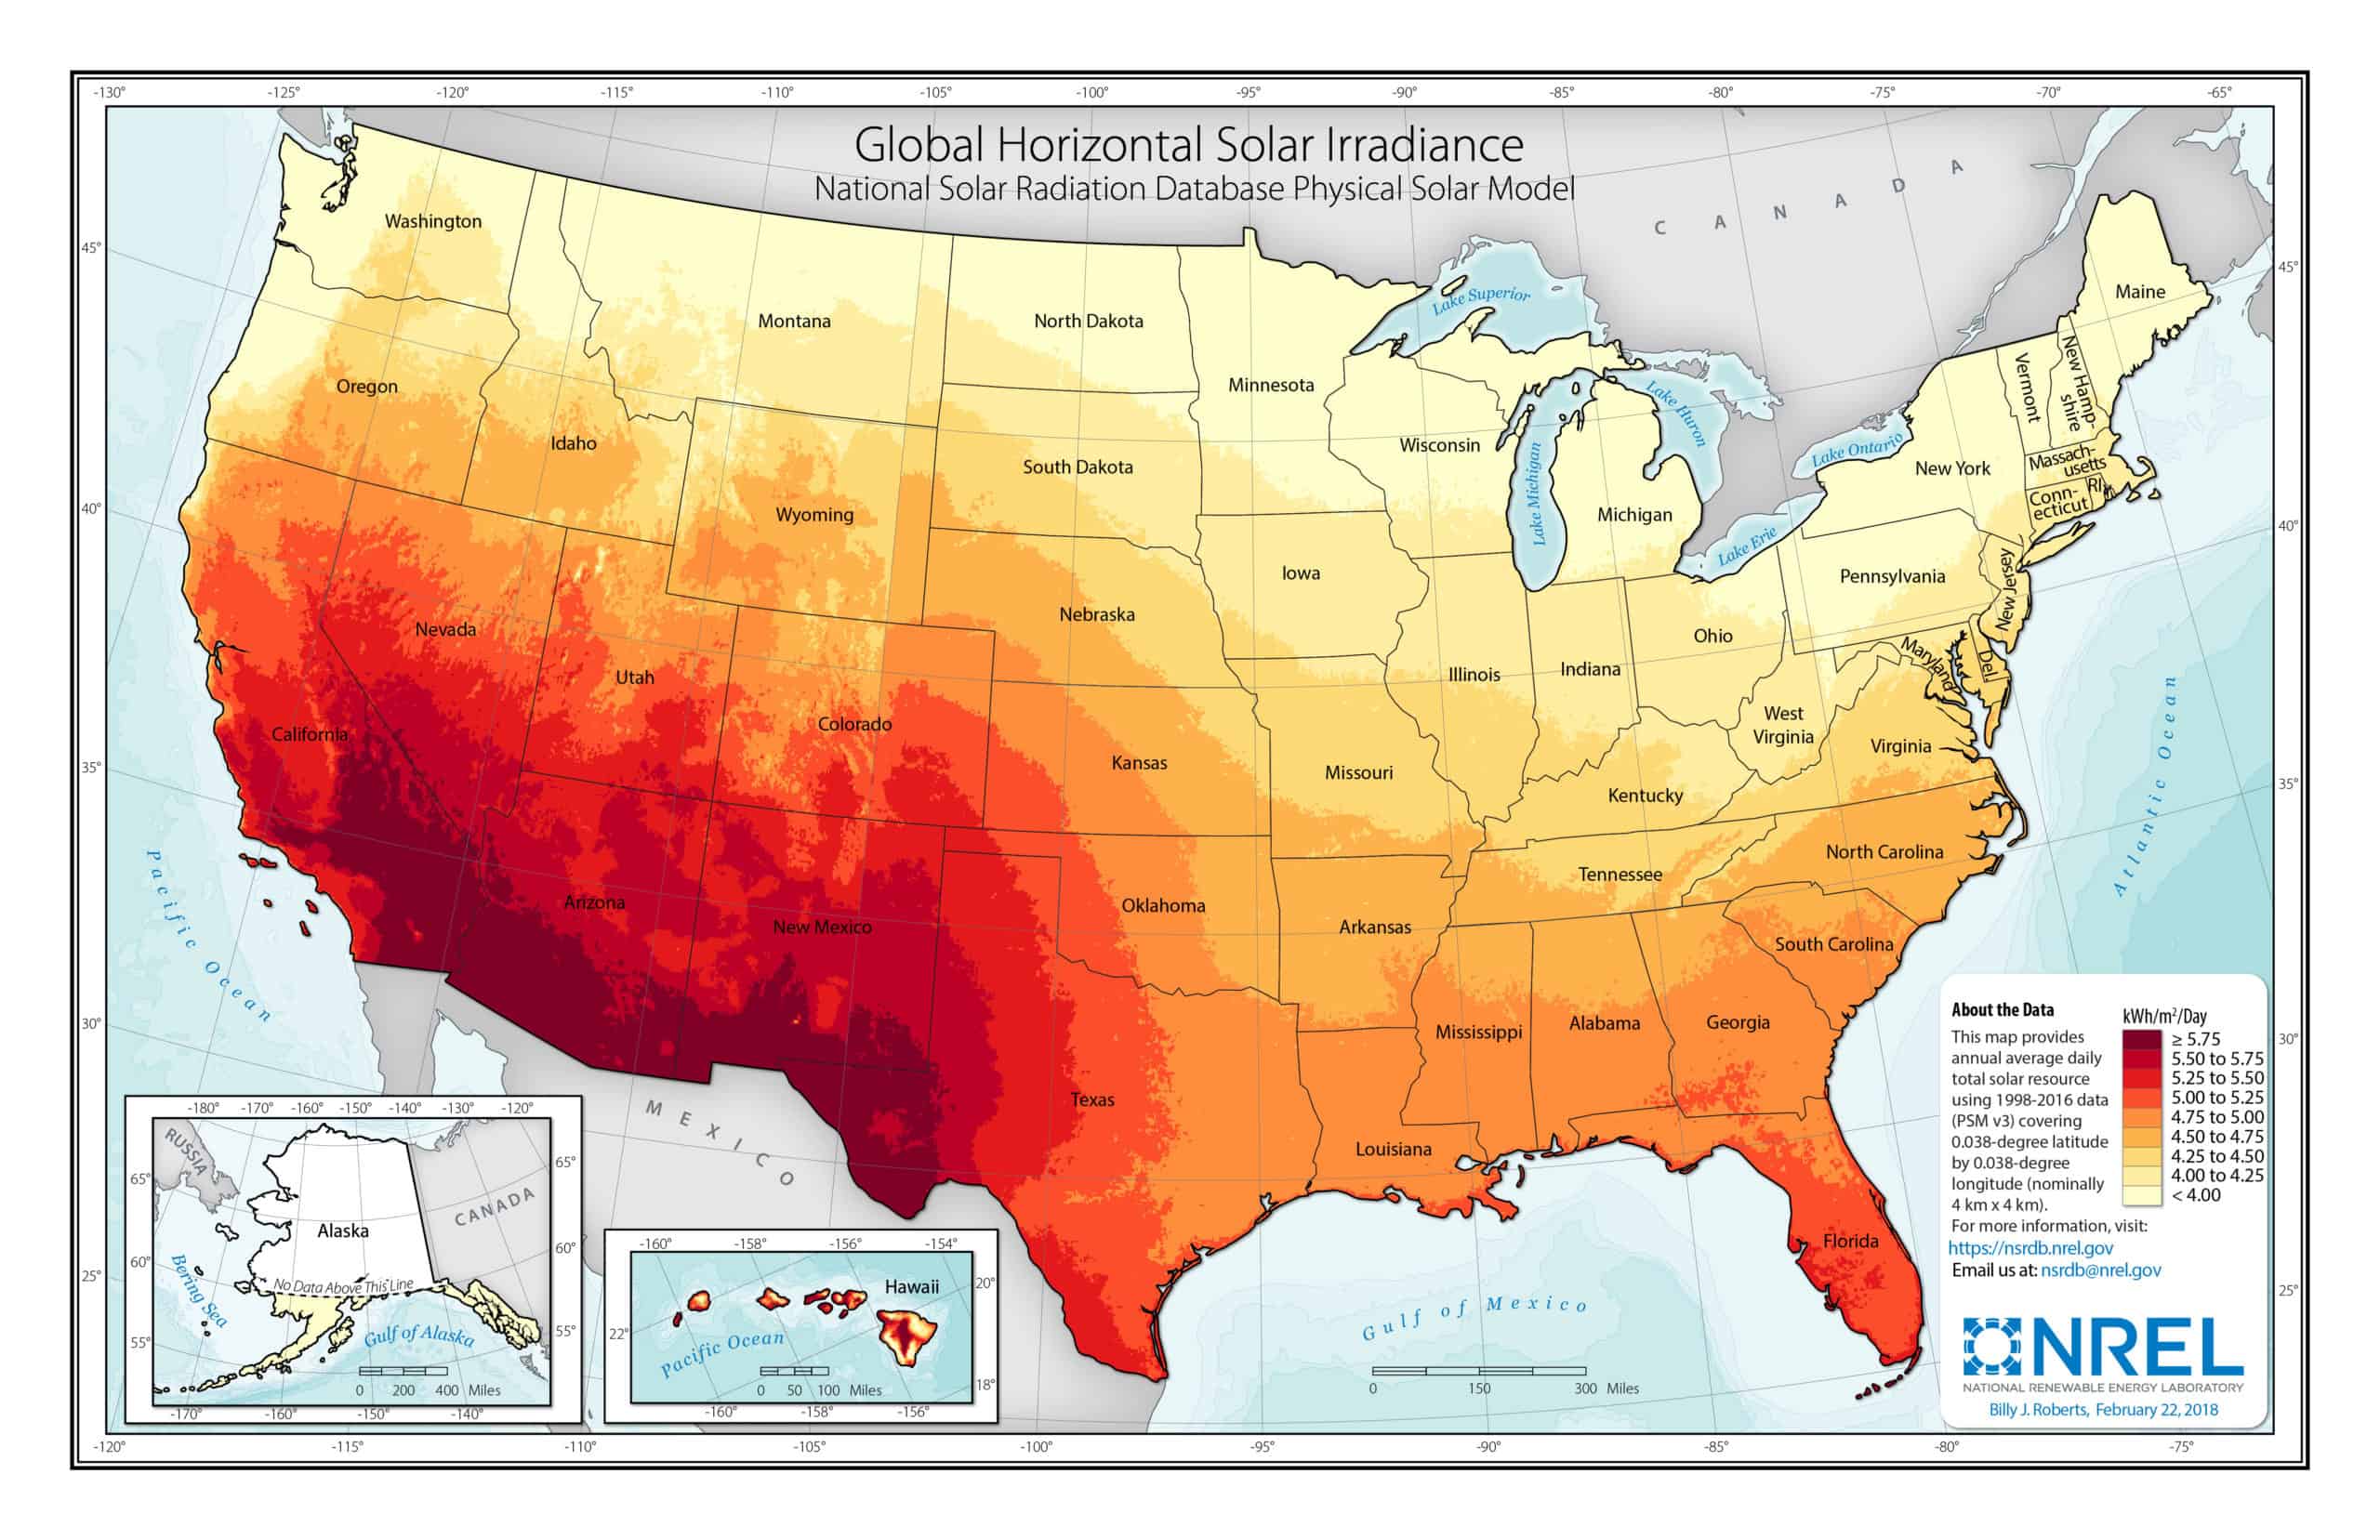
Sengupta, M., Y. Xie, A. Lopez, A. Habte, G. Maclaurin, and J. Shelby. 2018. “The National Solar Radiation Data Base (NSRDB).” Renewable and Sustainable Energy Reviews 89 (June): 51-60. Also available at https://www.nrel.gov/gis/solar.html
If you are outside the U.S. or find the map difficult to use, there is a great tool available at https://globalsolaratlas.info/map
Search for your location in the search bar, or simply click your location on the map. Several figures will be displayed. Take the value for yearly Global Horizontal Irradiance, and divide it by 365 to get your daily average.
Next, you need to convert your irradiance value to “Peak sun hours”. This is a term commonly used to describe how much sun a certain location receives. The equation is very simple because one peak sun hour = 1kWh/m² (or 1000Wh/m²).
For example, if you are in some areas of California you might receive 2000kWh/m² per year. Dividing this by 365 gives you a daily average of around 5.48kWh/m². As one peak sun hour is 1kWh/m², this equates to 5.48 “peak sun hours” per day on average.
The term “Peak Sun Hours” is somewhat misleading, as some areas will actually receive more than 1kW/m² during the sunniest parts of the day. It is a useful number to use however, because the nameplate ratings of solar panels are given based on 1kW/m².
3. Calculate your required solar system size in watts
First, take the average kWh power usage per day that you calculated in step 1, and divide it by the average sun-hours per day you calculated in step 2.
For example, using the examples above, we had a house that required around 27.4kWh/day, and a location in California with average peak sun hours per day of 5.48.
27.4 ÷ 5.48 = 5kW DC.
However, this isn’t the end of our calculation. There are many factors, such as shading, soiling, and temperature, which result in the panels not producing as much electricity as they would in optimal conditions. Because of this, we need to add a buffer, or derating factor, to take these losses into account.
A commonly used derating factor is 0.8. This is a good estimate for a typical system. It assumes typical loss values for shading, soiling, degradation, inverter efficiency etc.
If your site has unusual conditions, such as a poor azimuth or heavy shading, then a lower factor will need to be used, or you may be better off using one of the tools listed in the “Online Tools” section below.
In our example above, we need to find the system size that once derated by 0.8, will produce the required 5kW. Therefore:
5kW ÷ 0.8 = 6.25kW DC.
Therefore a solar array of approximately 6.25kW DC is required.
Using this method will give you a good idea of the PV system size that is going to be appropriate for your household. It can be used in a first assessment to see whether installing a PV system makes sense for you, and to calculate initial cost assumptions.
However, it is also recommended to use one of the tools listed in the Online Solar Sizing Calculators below, before you decide on a final number and start spending money.
This will enable you to further refine the estimate to include the specific conditions of your roof and location.
An additional benefit of many of the tools is that they can help you to determine the financial benefit you will get from the system, such as the payback period.
Determining PV system size when on a feed-in tariff. Or not paid for exporting at all.
If you have already determined that you are on net metering, and have gone through the steps in the section above, click here to skip to the next section.
If you live in an area where a feed-in tariff system is used instead of net metering, then your system sizing can become a bit more complicated. Essentially you would need to calculate your payback period, or Internal Rate of Return (IRR) to come to an optimal system size. Luckily, there are online calculators available that can help to simplify this process.
If you have a high feed-in tariff, simply building as much as you can afford, or as much as your roof can fit, can be the best solution. This is becoming less common however as governments reduce feed-in tariffs as solar has become cheaper. You also need to consider whether the tariff will be reduced in the future.
If you are on a fairly low feed-in tariff (or none at all), for example in Australia where feed-in tariffs are as low as 6-10¢/kWh compared to retail electricity prices which can be over 30¢/kWh, it may not be worth exporting energy to the grid.
If you are not getting paid enough for that electricity you are exporting, it doesn’t make sense to pay for a large expensive PV system where most of the electricity will be exported without any benefit to you.
Instead, you should try to match the expected electricity generation of your system, with your household electricity usage, even as they both vary on a daily and seasonal basis. You will always have some export to the grid because the two won’t perfectly match, but the goal is to find the system size where the cost of increasing the size of the system begins to outweigh the additional benefit.
There are rules of thumb you can use to simplify the calculation for typical residential systems and attempt to work it out by hand, however this level of analysis is outside the scope of this article. For the vast majority of people, we instead recommend the use of one of the many online calculators which can do this for you. These calculators can help you to compare financial metrics such as payback period, or Internal Rate of Return (IRR) for different systems, in order to find the best one for your situation.
Online Solar Sizing Calculators
As already discussed, the internet is full of different solar calculators to help you size your solar system, and calculate your payback period and other financial metrics.
Keep in mind that many of these tools will assume you are paying someone to install your system and will make assumptions on these costs in the calculations. If you are planning to do some or all of the installation yourself you should make sure to estimate your system cost appropriately and enter this value if the calculator allows it.
Here are a number of free calculators for different regions to get you started. If you don’t see a tool for your location or situation, then be sure to check online. There are a huge number of solar calculators out there and you should be able to find one suitable for your region.
Global
- https://globalsolaratlas.info/map
A simple tool that can be used globally. It allows you to input location, azimuth, tilt, and system size, and will calculate the output of the system. It provides monthly values, as well as average hourly profiles.
USA
- https://pvwatts.nrel.gov/pvwatts.php
A tool by the United States National Renewable Energy Laboratory (NREL)
You input your location and then your system info and retail electricity rate and it will estimate how much electricity your system can be estimated to make, and the $ value of that electricity. Since it will only give results based on your input, you have to use trial and error to find the correct system size for your needs. - https://sam.nrel.gov/
Another tool by the NREL, this is much more detailed software that can give you very accurate estimates of your PV system output, as well as carry out a financial analysis. It has a much steeper learning curve than the other simpler calculators on this list, and therefore not suitable (or required) for most people).
Europe
- http://www.pvp4grid.eu/cmt/
Calculator for most of Europe. Is available in 7 languages.
It does not enable many detailed inputs, relying instead on general assumptions, therefore its accuracy is limited. It can provide a good starting point for whether solar makes sense for you, and if so what an appropriate size would be. - https://re.jrc.ec.europa.eu/pvg_tools/en/tools.html
This is a tool by the European Commission, although it also covers many other parts of the world. It can be used to estimate the monthly output of a solar PV system, and also calculate the cost per kWh. - https://www.pvfitcalculator.energysavingtrust.org.uk/
A tool for the UK – It is fairly basic, but helps calculate payback time. - https://www.seai.ie/tools/solar-electricity-calculator/
Very similar to the UK one but for Ireland – Can roughly calculate payback time
Australia
- https://solarcalculator.com.au/
For Australia. Once you have run the system once, you can modify the system inputs to instantly see how that change affects the results. It is also able to calculate the effect of installing battery storage. - https://www.ecoonline.com.au/australian-solar-pv-system-payback-calculator/
For Australia, a fairly complex payback calculator which includes all metrics necessary to calculate your expected payback time based on the system size you input (Therefore requires some trial and error). It has the additional benefit of being able to compare two different system size options side by side.
Determine how many solar panels you need
Now that you have determined the overall size of the system you need, you can start to size the individual components of your system.
The first item you should look at is the solar panels themselves. If you have already read our article on solar panel selection for grid-tied systems then you should already have a good idea of which type of panel you would like to use.
First, you need to make sure that you can actually fit the system size you calculated in the previous step. To do this simply divide the total Watts required by the Watts of the solar panel.
For example, if you have calculated that a 6kW system would be the best for your situation, and you have found a 300W panel you would like to use, then you will need 20 panels.
You then need to check that you have enough roof space to fit this many panels. The best way to do this is by creating a drawing, which will also help you visualize how the system will look. This can easily be done by hand or if you prefer to create a digital drawing, by using computer-aided design (CAD) tools such as Sketchup.
If you find that your rooftop is not large enough, you will have to either choose a higher efficiency panel or consider reducing the size of your system. On the other hand, if you still have plenty of room to spare, you could potentially consider using a lower efficiency panel with a lower cost per watt to reduce the total cost of your system.